Time Flies and A Great Red Jacket
Wow, it's been a couple weeks since I last posted. It's been a busy time! I've been out and about a lot - seeing the World Of Threads Festival shows in Oakville and Toronto, going to the ROM to see the new textile show "Big" and enjoying some (finally) nice autumn weather.
But in-between the outings I have been working hard at the sewing machine. So here it is (drum roll) - my first garment of the sabbatical. I'm very pleased with how this jacket turned out! It took a rather long time to make but the process has been totally worth it.

Inspiration
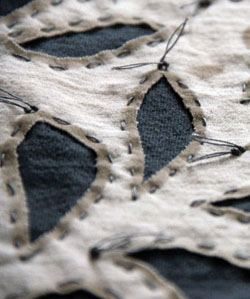
I've always been attracted to the modular design patterns by Kayla Kennington. And always quite intimidated too! Kayla's patterns are all built of simple geometric shapes which makes them easy, but they are not sewn with traditional seams. Instead the pattern pieces are all finished with rolled hems, finely served edges or lined and turned. And then the pieces are connected by decorative stitching, bar tacks or beads. A huge amount of work, which is just one of the intimidation factors.

The other intimidation factor is that all the garments are made from fine fabrics - often silk. OK, I'm all for that, except that thin silky fabrics are tricky to sew and don't really work for me in an Ontario winter. And what is the point of sewing something that I can't wear right now?
So I've taken the bar tack approach, and have applied it to a warmer, thicker fabric - boiled wool.
The Pattern
To start this project, I drafted a pattern for an Asian inspired jacket entirely made up of straight sided geometric forms. I could have gone with a basic kimono shape (would have been faster for sure), but I wanted to make something that was a bit more fitted and figure flattering than a basic rectangle.
I went with a more A line shape and you'll see that I have inset the sleeves into the body of the jacket to allow a trimmer silhouette and visual interest. This sleeve form was taken from a sashimi quilted jacket that I found at Value Village some years ago.
I did not make a muslin of this pattern. I know, I know, you should always make a muslin. But I hate doing it, and since this was based entirely on body measurements, I figured it would be OK this time. It was. Here's the basic pattern:

The Fabric
I hate stiff and/or heavy clothes. So I'm always looking for fabrics and garments that have a nice drape. I've always loved boiled wool for its soft hand, mid weight and non-ravelling nature. I've sewn successfully with boiled wool in the past, but the traditional way of doing seams in this fabric (lapped seams) really creates quite a bit of structure and so the drape is lost.
I hoped that using this alternative way of joining the pieces would avoid this and I am completely thrilled with result. The fabric still flows very nicely as there are no stiff seams to interfere. In addition I often find that boiled wool improves with wearing, getting softer and taking on the form of the body over time. I'm looking forward to this effect making the spaces between the bar tacks more apparent.
This jacket took less than 2 metres of fabric. Lots of good sized pieces left over… further crafty ideas ensue.
Testing
I spent the better part of day doing tests for this jacket. It took some time to work out the best stitch, spacing, thread type and sewing method. One of the trickier problems to solve was what to do where 3 or 4 point came together. I played around with various colours for the bar tacks but in the end decided to go for optimum graphic punch of black.
I also had to find the right stabilizer to use. Water soluble was not an option here as it would change the nature of the fabric. Tear aways didn't perform very well as the bar tacks' grip on the edges of the fabric are very small. I also got out the manual for my sewing machine and learned to use some features that would make the production process a bit easier.
All in all, the testing and samples I made were integral to the overall success of the final jacket.
Making It
All the pieces for the jacket where cut with a (fresh sharp) rotary blade. I had a 50% off coupon for Michaels and treated myself to a second large cutting mat. Taping the two together meant that I could do the longest pieces of the pattern in one continuous cut. Really clean cut edges were vital for this garment. All the cuts were simply done with measurements. No need for actual pattern pieces.

 I really appreciated my trusty BabyLoc sewing machine on this project. I was able to customize a decorative stitch to create a single embroidered dot of the right size and specifics and then save this in memory so that every time I sat down to do a few seams, it was ready to go. Additionally, the knee controller for the presser foot came in so handy. Altogether I was about as automated as I could get.
I pre-cut long strips of tissue paper (red to assure that any tiny bits caught in the stitches wouldn't show, and then pinned the first couple of inches of each pattern piece to these. Once a seam was underway, I didn't really need to have the whole thing pinned, although I can see that you would have to if the fabric was in any way slippery.
The only thing that I pinned down the entire length of each seam was a painters tape "ruler" that I had made to help me consistently space the dots.
 I used rayon embroidery thread for the top - gives the dots a subtle sheen, and regular thread for the bobbin. I got smart (for once) and pre-wound 2 bobbins. Ended up needing only 1!
All that was left to do was sit it out. And boy, did I spend a lot of time sitting at that sewing machine. Hours over the course of days. Thank heavens for CBC radio! I also had a couple of small side projects on the go for when the monotony of dots got to me.
I only ran into one challenge... I hadn't thought about how I would bar tack both seams on the sleeves! The narrow sleeves would not allow me to get to the whole seam on the underside of the sleeve. My solution was to machine stitch the first few dots at the top and bottom of the sleeve, and hand embroider the ones in the middle. Worked well, just took a little more time.
The Finished Result
Well, I have to say I am SO pleased with how this turned out. Not only does it fit perfectly, it feels great to wear - so light and swingy while not being oversized in any way. It has a great graphic impact due to the long rows of black dots defining the structure of the jacket. It is really exciting to have something come out exactly as I hoped and imagined
I'm working on an idea for a small embroidered medallion to go on the upper back panel. I'll post that addition when it is complete.
I can envision more garments made this way, perhaps with panels of irregular lengths and angle cut bottoms!
OK, now for lots of views...


But in-between the outings I have been working hard at the sewing machine. So here it is (drum roll) - my first garment of the sabbatical. I'm very pleased with how this jacket turned out! It took a rather long time to make but the process has been totally worth it.
Inspiration
I've always been attracted to the modular design patterns by Kayla Kennington. And always quite intimidated too! Kayla's patterns are all built of simple geometric shapes which makes them easy, but they are not sewn with traditional seams. Instead the pattern pieces are all finished with rolled hems, finely served edges or lined and turned. And then the pieces are connected by decorative stitching, bar tacks or beads. A huge amount of work, which is just one of the intimidation factors.
The other intimidation factor is that all the garments are made from fine fabrics - often silk. OK, I'm all for that, except that thin silky fabrics are tricky to sew and don't really work for me in an Ontario winter. And what is the point of sewing something that I can't wear right now?
So I've taken the bar tack approach, and have applied it to a warmer, thicker fabric - boiled wool.
The Pattern
To start this project, I drafted a pattern for an Asian inspired jacket entirely made up of straight sided geometric forms. I could have gone with a basic kimono shape (would have been faster for sure), but I wanted to make something that was a bit more fitted and figure flattering than a basic rectangle.
I went with a more A line shape and you'll see that I have inset the sleeves into the body of the jacket to allow a trimmer silhouette and visual interest. This sleeve form was taken from a sashimi quilted jacket that I found at Value Village some years ago.
I did not make a muslin of this pattern. I know, I know, you should always make a muslin. But I hate doing it, and since this was based entirely on body measurements, I figured it would be OK this time. It was. Here's the basic pattern:
The Fabric
I hate stiff and/or heavy clothes. So I'm always looking for fabrics and garments that have a nice drape. I've always loved boiled wool for its soft hand, mid weight and non-ravelling nature. I've sewn successfully with boiled wool in the past, but the traditional way of doing seams in this fabric (lapped seams) really creates quite a bit of structure and so the drape is lost.
I hoped that using this alternative way of joining the pieces would avoid this and I am completely thrilled with result. The fabric still flows very nicely as there are no stiff seams to interfere. In addition I often find that boiled wool improves with wearing, getting softer and taking on the form of the body over time. I'm looking forward to this effect making the spaces between the bar tacks more apparent.
This jacket took less than 2 metres of fabric. Lots of good sized pieces left over… further crafty ideas ensue.
Testing
I spent the better part of day doing tests for this jacket. It took some time to work out the best stitch, spacing, thread type and sewing method. One of the trickier problems to solve was what to do where 3 or 4 point came together. I played around with various colours for the bar tacks but in the end decided to go for optimum graphic punch of black.
I also had to find the right stabilizer to use. Water soluble was not an option here as it would change the nature of the fabric. Tear aways didn't perform very well as the bar tacks' grip on the edges of the fabric are very small. I also got out the manual for my sewing machine and learned to use some features that would make the production process a bit easier.
All in all, the testing and samples I made were integral to the overall success of the final jacket.
Making It
All the pieces for the jacket where cut with a (fresh sharp) rotary blade. I had a 50% off coupon for Michaels and treated myself to a second large cutting mat. Taping the two together meant that I could do the longest pieces of the pattern in one continuous cut. Really clean cut edges were vital for this garment. All the cuts were simply done with measurements. No need for actual pattern pieces.
I pre-cut long strips of tissue paper (red to assure that any tiny bits caught in the stitches wouldn't show, and then pinned the first couple of inches of each pattern piece to these. Once a seam was underway, I didn't really need to have the whole thing pinned, although I can see that you would have to if the fabric was in any way slippery.
The only thing that I pinned down the entire length of each seam was a painters tape "ruler" that I had made to help me consistently space the dots.
All that was left to do was sit it out. And boy, did I spend a lot of time sitting at that sewing machine. Hours over the course of days. Thank heavens for CBC radio! I also had a couple of small side projects on the go for when the monotony of dots got to me.
I only ran into one challenge... I hadn't thought about how I would bar tack both seams on the sleeves! The narrow sleeves would not allow me to get to the whole seam on the underside of the sleeve. My solution was to machine stitch the first few dots at the top and bottom of the sleeve, and hand embroider the ones in the middle. Worked well, just took a little more time.
The Finished Result
Well, I have to say I am SO pleased with how this turned out. Not only does it fit perfectly, it feels great to wear - so light and swingy while not being oversized in any way. It has a great graphic impact due to the long rows of black dots defining the structure of the jacket. It is really exciting to have something come out exactly as I hoped and imagined
I'm working on an idea for a small embroidered medallion to go on the upper back panel. I'll post that addition when it is complete.
I can envision more garments made this way, perhaps with panels of irregular lengths and angle cut bottoms!
OK, now for lots of views...


Comments
Post a Comment