Tiny Birds
Here's the thing about being on sabbatical. Sometimes you can just say yes to a slightly ridiculous notion and run with it.
I woke up one morning in December with the idea of making some little felt birds. 3D, fully hand sewn tiny birds. I've no idea where the notion really came from, but the form of them was pretty clearly worked out in my mind before I even got out of bed.
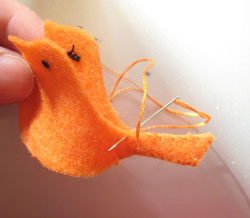
The first one I made was roughly the right shape but way too big. Which is a strange thing to say when you consider that I had no idea what I was making the bird for in the first place. The second one was much (much!) smaller, but too fat and a bit lumpy. The third one, like porridge for bears, was just about right. Patten refined and with tail options, and with the correct stuffing medium in hand, I started sewing little birds. And sewed, and sewed, and sewed.

About a dozen birds later I had a nice little flock rolling around on the kitchen table. They were colourful. They were funny. And I soon discovered that they were pushy.
First they demanded Santa hats. Ridiculously small Santa hats. Then ear muffs. And scarves.

And just as I was considering how to make hats with ear flaps, and mitts on idiot strings they demanded an outing.
Lucky for them, Mark turned up with a most surprising thing... a dozen tiny red and black sleds, perfectly sized for the birds. How he came to own these, I'm not sure. He says he originally intended them to be gift wrap decorations, each carefully painted with the word 'Rosebud'. Too clever, my husband.

These proved to be quite addictive to make.
Here are some step by step instructions in case you want to make some too. Just be careful - these birds have minds of their own!
Pattern Pieces:
 I just used felt that I had on hand - you don't need much! Cut 2 bodies and little wings, and one beak and gusset. You can make the gusset wider or narrower - depending on how fat or thin you want the bird to be. In fact, these can be made into flat decorations, just by discarding the gusset. Might be nice as a gift tag?
Sewing:
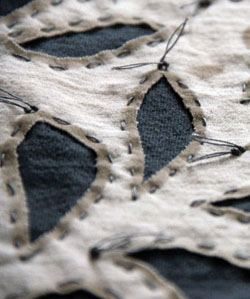
I used two strands of embroidery floss for all stitching on these, and a simple slanted overcast stitch. You could blanket stitch them as well, perhaps in a contrasting colour.

Start sewing the body sides together, just below the beak. After about one cm, attach the gusset to one side.


Stuffing:

Use a soft stuffing- not batting. Even cotton balls pulled apart would work in a pinch. Use some pointy object to push a bit of stuffing into the start of the tail, then sew closed.
Wings:
Hats etc:

The hats were made from a quarter of a 2.25 inch circle of felt and strip of white. Patience required - these are tiny little things to stitch!
So there you go. Send me a picture if you make a bird!

It's been quite a while since you post this so I hope you would read this comment. First of all thanks for making the story of these birds so funny... I could actually picture you and your kitchen with the flock in my head and it was so nice. (You should consider writting stories). Now, the birds are absolutely adorable. I am a scrapbooker.. nothing to do with sewing but suddenly I feel the urge to make this lovely birds... and since we are in lockdown in my city, I would probably end up making some. Thank you so much for sharing this tutorial. Lots of love from Chile. Elisa.
ReplyDeleteOh Elisa! Thank you! This is so nice. I’m glad you enjoyed the post and birds. Yes, it’s been a long time since I wrote this. I can’t believe it has been 8 years. Wow. I am still making all kinds of things. Your comment has made me think I should get back to blogging. We are in lockdown here too. Some fun creative projects are just what we need right now. Stay safe! 🤗
Delete